Lemon and Raspberry cupcakes!

Apologises for my lack of posts this weekend but it's my last few weeks of term so I've been pretty busy, not too busy though to fit in a little baking for one of my classes. So I made Lemon and raspberry cupcakes! 


I thought you all might like these spring lovelies as much as I do.. 


This recipe will make you 10-12 cupcakes. 
Ingredients:
120g self raising flour, 
150 caster sugar, 
2 teaspoons lemon zest, 
2 tablespoons lemon juice, 
40g butter, 
120ml milk, 
1 egg, 

Icing ingredients: 
250g icing sugar, 
80g butter, 
2 tablespoons milk, 

200g raspberries, 
3 tablespoons lemon juice, 
3 teaspoons caster sugar, 
Splash of water, 

Preheat the oven to 200 degrees before you start. 


1. Add the sugar, flour, lemon zest and butter into a bowl and mix with an electric whisk until it resembles fine breadcrumbs. 2. Add the milk and lemon juice gradually and mix until fully combined. 3. Add the eggs slowly while whisking the ingredients. 4. Whisk for a few minutes until the mix is fluffy and soft.


5. Fill your cupcake cases 3/4 full and pop in the oven for 20-25 minutes, check at 15 minutes to make sure they're not burning. 


6. Grab your icing ingredients!


7. To make the buttercream taste deliciously of raspberry we're going to add a raspberry reduction. 
So add the lemon juice, water and sugar to a pan and dissolve the sugar slightly then add the raspberries. Hint! Mush down some of the raspberries to speed up the process. After you've got a syrup like consistency sieve the raspberries seeds out and you'll be left with a thin puree. 


8. Next put your icing sugar (sieved) and butter in a bowl and cream the two together. It's good to start this off with a spoon to reduce the crazy mess you get if you use a whisk straight away. 


9. Once your buttercream is smooth add the raspberry puree and whisk again until combined and fluffy. 


Next up.... Add your buttercream to the top of your cupcakes and finish with a raspberry. 


Enjoy! The dreary Friday weather we had yesterday was brightened up by these spring treats. 
I hope you enjoy them too!

Katy

Pom Pom napkin rings

A few posts back I made Napkins which I hand embroidered. The obvious next step was napkin rings so I did a little Pinterest searching and found some ideas with pom poms, and really who doesn't love pom poms!
I remember making them as a kid and loving them, they're easy and super cute! 

These are super easy to make and incorporate three different size pom poms, large, medium and small. They also use hair ties which I know most people will have lying around the house, usually in places you would never expect!

So to make these you're going to need: 
A couple of sheets of card, 
1 large ball of wool, 
Scissors, 
Various circular objects of different sizes, 
4 hair ties, 


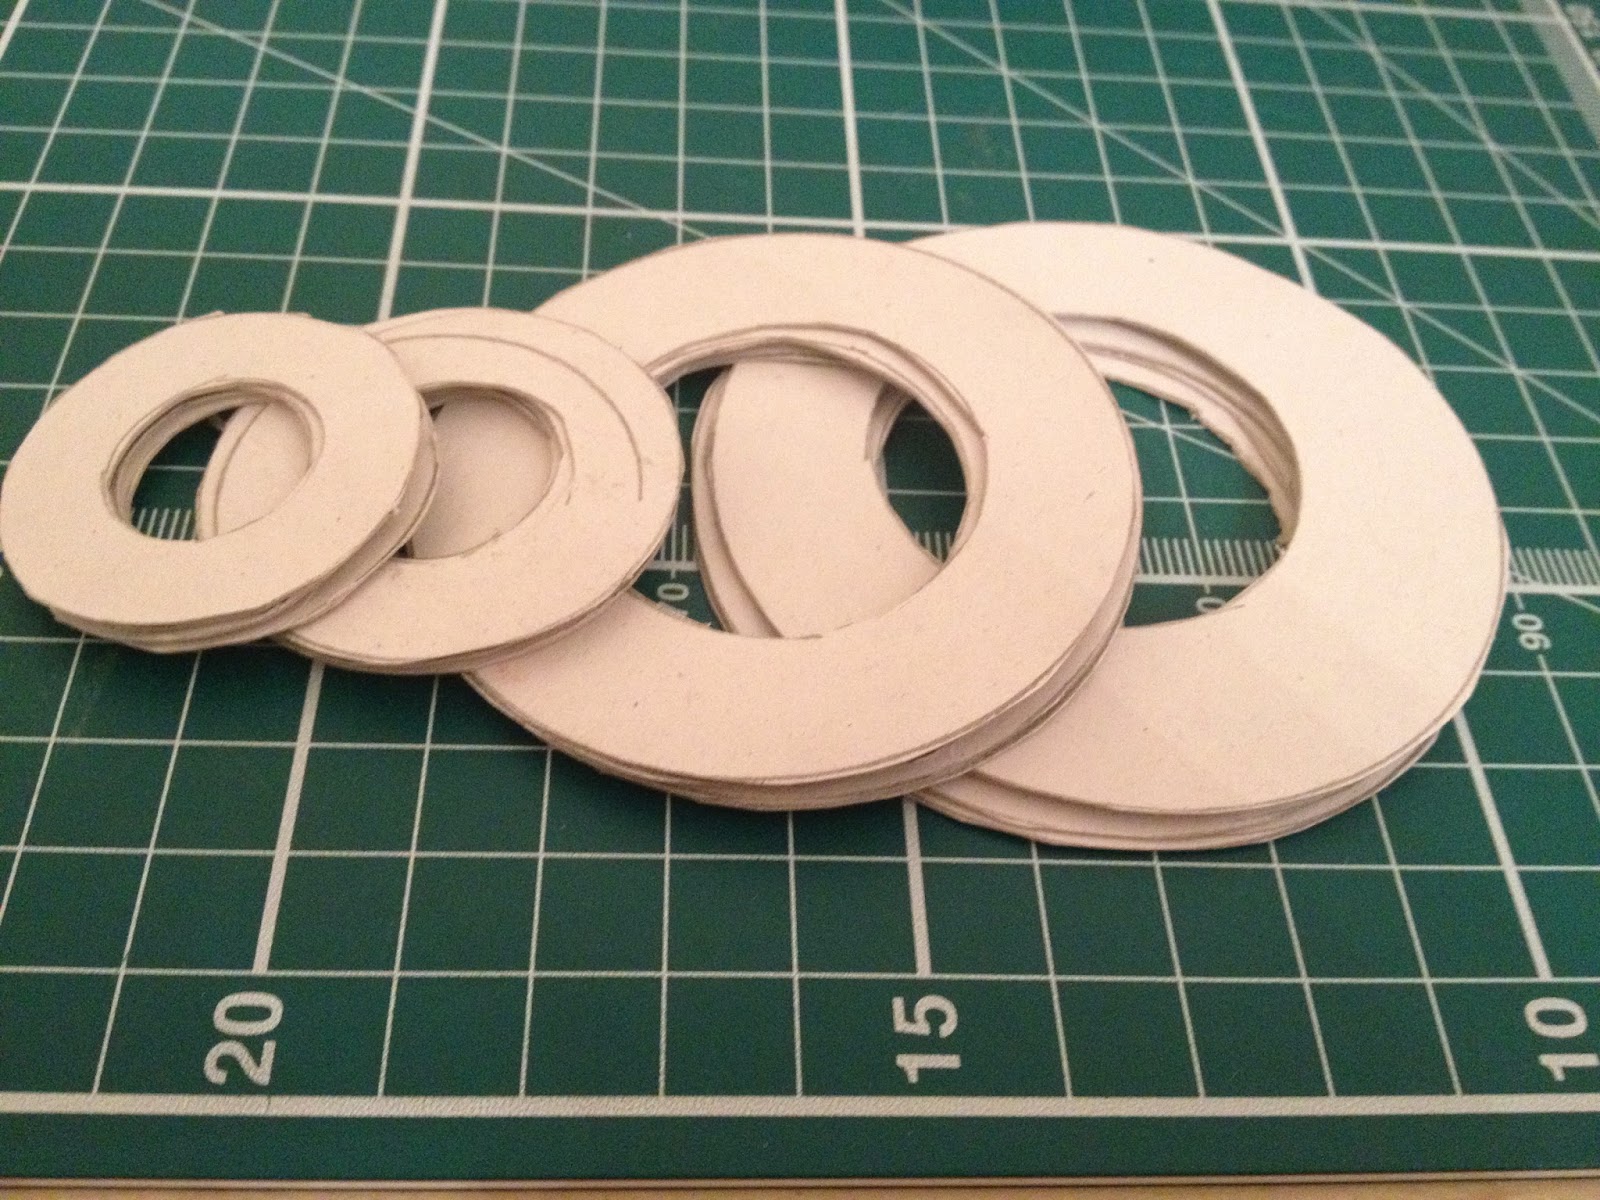
Take your various objects and trace round them to make your card circles for the pom poms, you'll need large medium and small ones. Altogether you're going to need 8 of each size to make 4 napkin rings.


Cut your circles out and make them into rings like above. 


To get started take 2 rings and put them together. Cut yourself a length of wool, make sure it's not too long so you can still control it. 


Start looping the wool through the rings and layer until you've covered the whole ring a few times and so it's nice and thick. 


You'll need to keep adding string as you go round so just simply knot the new string to the previous one and continue looping. 


Once you've finished looping it should be quite thick and will take preserving to cut through. Try using small embroidery scissors to make the initial cuts and then a bigger pair to cut through big chunks.


When you've finally got all the way round separate the two rings slightly and slip a long piece of string round and between the two.
Pull the thread tight and knot securely then slide the rings off of the pom pom. Fluff up a little so he's nice and full and trim if any bits are longer than others.


Tada! Pom pom galore! You'll need to make plenty more of these in your different sizes ready to make into your rings.


Now to make them into your napkin rings! Take one hair tie and your three pom poms (one of each size) and use the long strings to knot them onto the hair tie, like below. Then trim the strings short once they're all attached.


You should end up with napkin rings like this!
You could also make these multicoloured depending on your colour scheme or just plain like mine. 


Once your finished you should have a set of pom pom napkin rings that will rival a store bought version at a fraction of the price!


Mother Day gift ideas:

So I thought you all might appreciate a few ideas for Mother's Day, I love to make my gifts because I think it's so much more personal. But I don't just restrict myself to the actual gifts, cards and wrapping can all be personalised too! I love to receive a gift that's so beautifully wrapped I can barely bring myself to open it, so I make sure that if I give a gift it's wrapped all pretty.

Here's some quick and easy ideas for presents and also for wrapping:

1. Cupcakes!


This must be one of the simplest ways to make your Mum something delicious and pretty. Try this recipe for Jammy Cupcakes and personalise with you Mum's favourite flavour of jam. 

2. A wall print.


Is there a quote your Mum loves or just want to tell her how much you love her? Try this wall print you can draw yourself for her. 

3. Hand embroidery.


My constellation embroidery can be personalised for you Mum too! Either choose her star sign or maybe her name and favourite colours, leave it in the embroidery hoop and she can easily hang it as a reminder of how much you love her. 

4. Hand painted plates.


Hand painted plates look wonderful and have that lovely handmade quality your Mum will love. Choose a pretty pattern, write her name or paint something she loves like a cupcake or a book. 

5. Personalised cards


Make your Mum a card, for these I dug out all my crafty bits and pieces and got creative. Hint: Washi tape is a lifesaver for jazzing something up! It'll go from simple to creative in just a few seconds!

6. Pin cushion. 


Is your Mum big into sewing try a home-made pin cushion, just grab 2 squares of fabric and sew along 3 of the edges, stuff full of wadding and sew the final side. Pretty, useful and simple! 

7. Pretty packaging. 


I'm posting my Mum's present home to her and wanted it to look pretty and inviting. So I grabbed a simple box and painted some polka dots on. 

8. Gift tags. 


Luggage tags can be a transformed into wonderful gift tags with a few simple ideas. 
Try grabbing some paint and roughly covering one side with a colourful lick of paint, once dry write on top of the paint for a cheerful tag. 
Or put to use that Washi tape collection covering tag with pretty patterns or edging with a floral flourish! 


Need more ideas? Well listen to your Mum, I'm sure she's mentioned things she'd love even if it's just a few nights off making dinner or time alone to relax with a book. 

What are you giving your Mum this year? 

Katy


Polka dotty T-shirt!

I'm mad about polka dots! Who doesn't love them! They're cute and so dainty.
I did a little spring clothes shopping and found a polka dot dress and skirt but searched high and low for a dotty t-shirt but couldn't find exactly what I wanted.

So I decided to make one! What better way is there to get exactly what you want!
Here goes, you'll need:


Your chosen t-shirt, 
Fabric paint- I used Dylon as it's the most available and cheap I've found,
Paint brush, 
Pencil, 
Paper/card, 


Start with your t-shirt laid out and pop your paper/card inside so to stop the fabric paint from going through to the other side.


Draw where you want your polka dots to be so you have a rough guide of where to paint once you start. They don't need to be the size you want just a rough guide to get you started.


Then get painting! I made my polka dots quite small and dainty but you can make them all whatever size you like. 


Keep going until you've finished polka dotting your whole t-shirt. Remember to move the paper around when when you're painting on different areas. You'll need to leave each area time to dry before you move on so not to smudge. 


Once it's all dry, this will take maybe 30 minutes to be fully dry, grab your iron (carefully obviously) and a piece of clean fabric or cloth and lay it over your t-shirt on the ironing board. 

Iron your fabric and t-shirt, make sure you iron all of your shirt and this will fix the fabric paint so that when you wash it it should stay put.


And you should end up with your perfect polka dotty t-shirt! 

What's your perfect polka dot? I'd love to see your creations!

Katy

Jammy Cupcakes

I'm cupcake MAD!
If there's one thing I couldn't live without baking it would be cupcakes. They're easy and delicious!
Cupcakes are adaptable and you can always find something in your kitchen to throw in, chocolate chips, lemon, there's so many options.

This jam cupcake recipe is no exemption and can be adapted for every kind of jam you have in your cupboard. Today I used my Mama's homemade Elderberry jam which G loves! We only had a little left so I thought I'd whip it up into something sweet.


Ingredients-

Cake:
120g unsalted butter,
340g self raising flour,
1/2 teaspoon of salt,
4 large egg yolks,
360g soft brown sugar (can be substituted with caster sugar for a lighter coloured cake)
180ml milk,
1 teaspoon of white wine vinegar,
150g of your jam,

Frosting:
450g icing sugar,
120g soft butter,
50g of your chosen jam,


How to:


Add your flour, butter and salt into the mixing bowl and combine together until it form the consistency of crumbs.


In the jug add half of the jam, the egg yolks, milk and white wine vinegar. Whisk until it's all combined thoroughly and turns the colour of your chosen jam.


Add half of the mixture from your jug to the dry ingredients whisk until fully combined. Then slowly add the rest of the mixture until the mix is smooth.


Fill your cupcake cases 3/4 full.


Put a drop of your jam on top of the filled cupcake cases and use a skewer to swirl the jam into the top of your cupcakes. 


Set your timer for 20 minutes but peep in the oven at about 10 minutes to check they aren't burning on the top. If they are pop a layer of tin foil over the top. 


To check your cupcakes are ready insert a skewer into the centre, if it comes out clean then they're ready if not put them back in for a 5 more minutes and check again. 


Once they're cool enough to touch take them out and leave them on a rack until cool to the touch. 


Now for the best and most delicious part (of course) the frosting! 
I could just eat a bowl of frosting on it's own to be honest but I suppose it should go on the cupcakes. 


Add your icing sugar and softened butter to a bowl and use a spoon to cream this together slightly before we bring out the hand whisk. 


Once it's all combined, and you won't get a sugar shower when you turn your whisk on, mix until fluffy and soft looking. 


Add your jam to the frosting and again whisk until fluffy and thick icing. You want it to hold it's own so if you lift your whisk out of the mix and it stays in a peak then it's perfect. 


Take your piping bags and fill with all your frosting. I use disposable ones because no fabric ones have been able to stand the test yet. 


Decorate in any way you like, swirls, slicks or dots of icing all look perfect because really the important part is how they taste. 

Last but not least. Eat!