Showing posts with label Homemade. Show all posts

Advent Day 8: 'Merry Christmas' Banner!

Merry Christmas! Christmas has always been my favourite time of year and this year is no exception. I want to have Christmas spirit in every inch of my house so I decided to make some banners to do just that! 

This is nice and simple and uses things you'll likely have around the house. 
You'll need: 
Black card,
String, 
Scissors, 
White pencil or Chalk pen, 
Hole punch. 


I cut 16 circles using a small bowl to outline the shape. I also punched two holes in the top to thread the string through.


Next up I used a chalk pen to draw my letters on, you can use a white pen or pencil. My banner reads *Merry Christmas*.


Once I finished all my letters I grabbed some green string and threaded my letters together.
I've hung one in my living room above the Christmas tree which you might have seen in my Christmas decorations on Monday! And another in our bedroom above our bed.


I'm all about easy ways to spread the Christmas cheer and this is one of them.

I hope you enjoy making and I'd love to see your pictures if you do! Find my Instagram and Twitter in the side bar.

Katy xx

Advent Day 2: 'Comfort and Joy' cushion

In my recent post showing you my living room Christmas decorations I featured this 'Comfort and Joy' cushion I'd made. I thought I'd give a little tutorial on how I made it!

It's really simple and it all starts with my envelope cushion cover DIY which you can find here and use to create the main part of your cushion cover.


Once you've got your pieces of fabric, take your full front piece and sketch your design lightly with pencil.


You can choose any stitch you like but I went for a split stitch where your stitch comes up in the middle of the previous stitch creating a raised texture.


The simplest way to embroider is to use a embroidery hoop, I used quite a large one and moved it as I worked to accommodate whichever part I was stitching. 


This was an easy festive touch to add to our living room. As our cushions are pretty neutral all year round I've just thrown a few extra Christmassy bits in to bring it into the season. 


You could choose whichever phrase you like when designing your cushion and use thread which fits your theme. I love the traditional reds and greens at Christmas.

If you make this feel free to tag me on Twitter or Instagram I'd love to see what you make! The links are on the side bar!

I hope the holiday spirit making you feel all jolly!
Katy xx

Christmas Dec DIY! Dried Oranges

I spotted dried orange slices recently at a Christmas Fair and thought they smelled and looked amazing but they were a little expensive for what was really some oranges! 

I was actually passing through Grainger market a few days ago and spotted 5 for £1 so I thought I'd give it a try. Warning this does take quite a long time, longer than a lot of the things I've read about this say. 


Grab your oranges and get slicing, the more solid your oranges the easier this will be as you want quite thin slices. Then pop them on a wire rack. 


Next up grab some kitchen roll or tissue and dab each side of the orange slices to soak up excess juice.

I then left mine over night in a cupboard to slightly dry out before I got started on them in the oven.


Next up set your oven temperature low around the 100' Celsius mark and put the slices in.
After 1 hour grab your tray and flip the slices over.

Again 45 minutes to an hour later flip them again.

In about 30-45 minutes some of them might be completely dry, you want to make sure they're almost see through and not sticky at all. If they are pop them back in for another 10 minutes and check again.

This process took me about 4-5 hours because I was switching out the finished orange slices for fresh ones until I had them all in the oven.

The thicker the slice is the long it will take to dry so don't worry if they're in for longer than the others or even longer than my recommended times so long as they are not burning you are fine.


With these ones I've decided to grab some string and string some of them together to make decorations for the house! These would also be great as potpourri with some cinnamon sticks and cloves, very wintery!


Another bonus is once you've finished your oven smells amazingly like oranges which is so nice compared to the usual oven smells.


Katy xx

Winter Baking: Gingerbread Hot Chocolate

I'm a lover of Gingerbread and peppermint and caramel and all flavours Christmassy. I'm not a lover of the price of them so last year I decided to test out a few things and see if I could recreate those delicious flavours at home..

After a few flops I was successful and I thought I'd share a few recipes with you!

First Gingerbread Hot Chocolate:


You'll need- Milk of your choice, Ground Cinnamon, Ground Ginger, Ground Nutmeg and Hot Chocolate powder. And Whip cream if you would like a little extra!

Grab your pan and heat up 2 cups of milk.


In a small bowl pop your hot chocolate powder and add a couple of shakes of ginger, nutmeg and cinnamon and mix them up.
Add the hot chocolate mixture into the milk and whisk while it heats up.


Once hot through and a little frothy turn the heat off and leave to cool for a minute.


Add it to you mug and if you're like me add whip cream and sprinkle with cinnamon.


Next Caramel Milkacino (Invented by G):

This one is a lot simpler and you will need:

Milk of your choice and caramel syrup.


Same as last time measure 2 cups of milk, start to whisk and while you are whisking add a shot of your caramel syrup (this is around 2-3 tablespoons) and keep whisking until nice and hot.


Again feel free to add whip cream if you like! G's not a fan though.


It's getting closer to December now and I'm so excited to decorate the house! I'll be posting some more wintery updates and as soon as we decorate I'll give you a little glimpse.

Enjoy!

Katy


Winter Star Garland DIY

I'm back after a little weeks break getting up to date with Uni work and I'm so excited for the winter season. Christmas is coming up so quickly!

So to get me in the winter mood I've been coming up with some Christmas blogging ideas and aided by Pinterest I've decided to give this DIY a go as I had some Fimo in my crafting stash.

This one is really simple but so sweet and wintery!


For this one string of stars I used two lines of the Fimo, so I still have lots left over. I made sure it was warmed up in my hands so it was easy to mould.


As I didn't have a star cutter I just drew a quick star and cut it out to use las a template.


Once I'd rolled out a small piece of Fimo to about a half a centimetre thick I laid the star on top and used my scissors to cut around the shape.


I did this multiple times until I had around 17 stars. If you want to make more stars and a longer garland just use more Fimo and keep making them until you're satisfied you have enough.


I popped two hole in the centre of my stars using a thumbtack, making sure the holes were big enough for you to pass a needle through.


Then bake the stars in the oven at 110'c for 30 minutes. They won't be completely hard until they return to room temperature so don't worry if they're a little bendy.


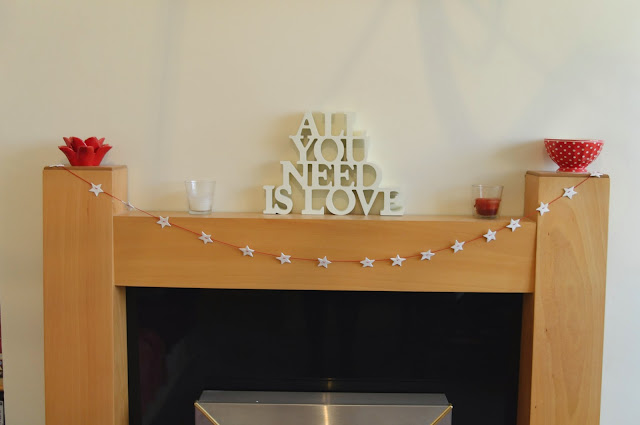
Finally I picked some red thread and a needle then strung the stars along the thread at 2-3 inch intervals.


Then up on my mantle they went. I used red as it went well in my living room but you can choose any colour!


These are nice and Christmassy so I can leave them up all season. I might even make some more to string around our tree in a few weeks!

I hope this has got you in the Wintery mood, I cannot wait for Christmas to be here it's my favourite time of year.

Tweet me or tag me in a picture if you make these I'd love to see how they look!

Katy xx

Cloud Cushions!

I've been staring at my fabric stash and trying to think of something to with it all. I wanted to practice my invisible stitching which is something I've yet to master so I thought I'd whip up a cute little cushion.

So why not a cloud!
These are really simple and you can even change the shape if you want to something festive or just something to match your decor.


First up I made a cloud template, I just taped together 4 sheets of A4 together, drew out a cloud shape and cut it out.


I took my fabric, which like me you may need to iron so it's crease free. I have a long piece which I folded in half so that once I cut out I will have two of my cloud shapes.

Pin your template down to your fabric and carefully cut out the shape.


Take your two pieces and place them good side together, like above, then pin together.


Sew around almost all of your cloud leaving a 3/4 inch gap so you can stuff your pillow. If you have a  cat like me you is obsessed with anything sewing probably best to keep them away from your machine. (Don't worry this was turned off so I couldn't catch her at all).


Once I'd sewn round the cloud I went round and added little cuts so once I turned it the right way out the edges would be as smooth as possible. Make sure you don't cut throw you sewing though.


Turn your cloud the right way out and get your stuffing at the ready. I actually used the inside of a cheap cushion I wasn't using but you can easily buy it at craft shops or on Amazon.


Once you've completely stuffed your cushion get ready to sew you invisible stitch! As I'm still new at this stitch and haven't quite perfected it yet I thought I'd include a link here which is what I used to teach myself. But once I've figured it out I promise I'll post a tutorial.


Once you're finished plump up your cushion and pop it into place!


I'm pretty sure I'll be making this cushion in lots of different shapes! Especially for Christmas it'll look super! 

Katy xx